Posts

Quick and Easy Valentine's Truck

Image
I LOVE old trucks...or should I say WE love old trucks! They have so much character and charm. This truck on creativefabrica.com is adorable so I decided to make a wood Valentine's craft with it. Here's what you will need to make it. A block of wood (something that has character) The vinyl cutout Transfer Paper Red paint Foam Brush Push Pin Transfer the vinyl to your block of wood. Paint the whole block of wood until you have the paint coverage you want. It may take a few coats. With the push pin, pull off the vinyl to reveal the wood behind it. The paint does not need to be completely dry for this step. That's it! Quick, easy, fun and cheap. I want to know if you make one! Happy Valentines Day!

Valentines Tobacco Basket

Image
We're finally getting back to normal around here after the holidays. I feel like it was just a whirlwind of craziness and it's time to look forward to an awesome new year! I have decided that I want to change up the decor in my living room (finally). I have been searching Pinterest and watching after Christmas deals to find new ideas for crafts and decor without breaking the bank. It has been amazing what I have found especially in the "Christmas" clearance. I do not need anymore Christmas decorations so what I look for is things that are marked "Christmas" but could be used all year round. Hence this tobacco basket. I picked it up at Hobby Lobby for $5 since it was considered "Christmas". I found this door decor at Dollar Tree. I only wanted one heart, so I removed the top one with the hanger on it and attached it to the tobacco basket. It took me less than 5 minutes and $6! I plan on switching out the heart and using other w

Ultimate Saran Wrap Ball Game

Image
For our extended family Christmas party this year, I decided to take the Saran Wrap Ball game to a whole new level. I have seen online and even played ones where there's mostly candy, and a few prizes and they are way fun! But I wanted to make it even more exciting. We asked each family member to contribute money instead of bringing a dollar gift to help buy all of this stuff. Here are some pictures of most of what we put in ours. The items mostly came from Amazon, Dollar Tree and Walmart. Since we made 4 saran wrap balls the blankets and filled mugs were in the middle. I made the designs on the mugs with my Cricut. Then we wrapped the bigger gifts. Some of them we combined to make sure the items were more even in price. I love this wrapping paper we used from Dollar Tree. We made 4 balls to help things go faster with 35+ people expected to come. So while we wrapped and sorted we put them into 4 boxes. Once everything was wrapped we wrapped them in Saran Wra

Refurbished Key Holder

Image
We love to go thrift shopping. Yard Sales, Goodwill, Deseret Industries etc. We have found so many cool things we have fixed up and made better over the years. This past Summer we found a yard sale that had this cute organizer. Since we bought a couple of big items they threw this in for free. Can't beat that! I wanted to give this gem a face lift so I took all of the hardware off and took the black chalkboard out. Then I sanded it so the paint would stick and wiped it down with a dry rag to get the dust off. I painted the chalkboard with regular black paint and the rest a teal color. Then lightly sanded and wiped it all down again before brushing on Minwax Polycrylic with a foam brush. I just followed the directions on the can. This is to seal it and make it easier to clean. After 2 coats of Polycrylic I had a nice even shine so I decided not to put on a third coat.  Next I worked on the "chalkboard" piece. With my Cricut I made a vinyl cut out wi

Autumn Birds in a Jar

Image
I am thankful for friends who love to craft! One of my friends and I made some spring birds in a jar last year. So when this fall rolled around, she wanted to make fall birds in a jar so of course I said, "Ok!" Through trial and error this is what we came up with. Start with a glass jar with a lid. I used a salsa jar that I removed the sticker from and washed up. Then add fake leaves to the bottom. You can decide how many birds to put in it. I chose 3. Since our front trees are always gifting us twigs and limbs, that's where I got mine for the birds to sit on. Measure the twig to make sure it will fit horizontally inside of the jar. Cut shorter if needed. Then glue the birds on with hot glue. On the ends add twine and cut to length how long you want them from lid to where you want it to be sitting. Find some colorful fabric to glue to the top of the lid. This is the tricky part. Glue the top of the twine to the inside of the lid with hot glue. You will ne

Baking Soda Miracle Cleaner

Image
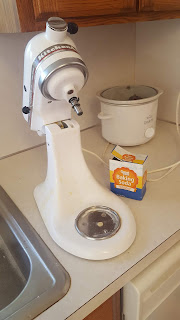
With the Holidays coming, people hosting the all important Thanksgiving Dinner (like I am) are thinking about deep cleaning the kitchen. One of the hardest thing to clean is the nasty grease that cakes on just about everything around the stove and counter areas. Soap does nothing but smear it. A few years ago I came upon posts about cleaning grease with Baking Soda. I thought nothing else is working so I gave it a shot. Within seconds I was amazed! It didn't scratch anything and brought up the grease so easily. I started cleaning everything in the kitchen with it! I even got my husband to try it and he was skeptical at first but hooked within minutes like I was. So how do you make your kitchen sparkly clean for your holiday festivities? Let's look at my Kitchen Aid. Gross right?! All you have to do is put some Baking Soda in a small bowl. Get a wet cloth and dab it in the Baking Soda. Rub that on the grease spots and ta-da! Grease is GONE! Then wipe off the